
Table of Contents
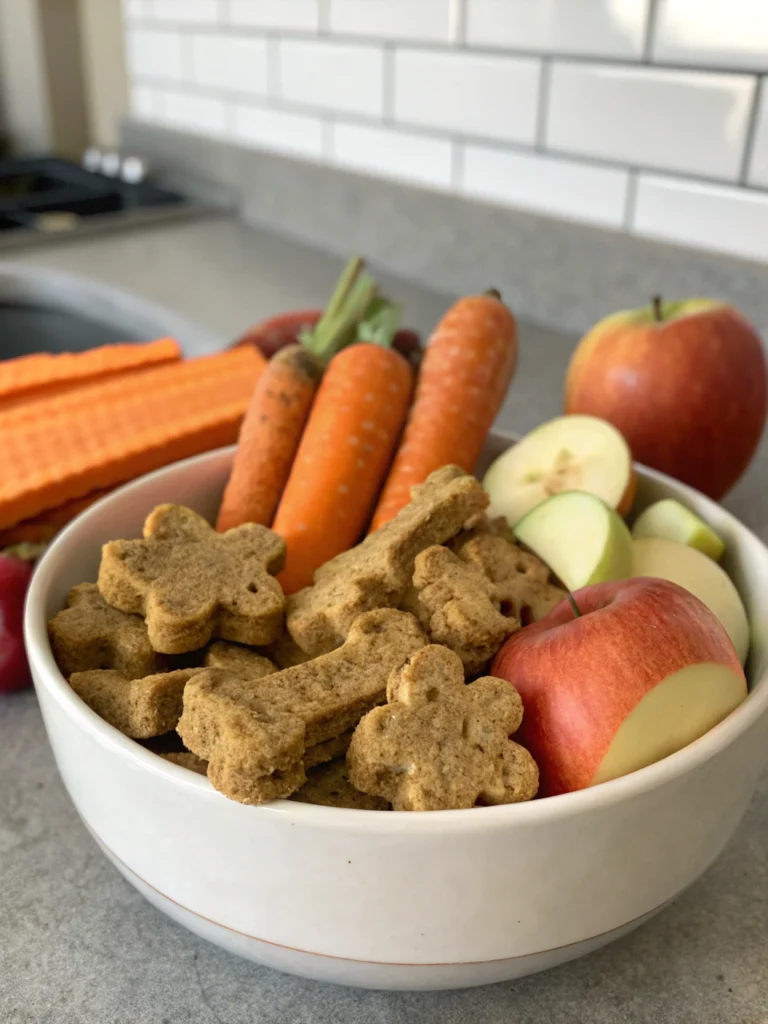
Have you ever wondered if the store-bought treats you give your furry friend are truly beneficial? Nearly 85% of dog owners express concerns about additives and preservatives in commercial healthy dog treats. In this guide, we’ll teach you a simple, wholesome recipe for homemade dog treats, ensuring your pet enjoys every bite without any worries. You’ll find that preparing nutritious snacks at home is not only easy but also incredibly rewarding, giving you full control over your dog’s dietary intake.
Ingredients List
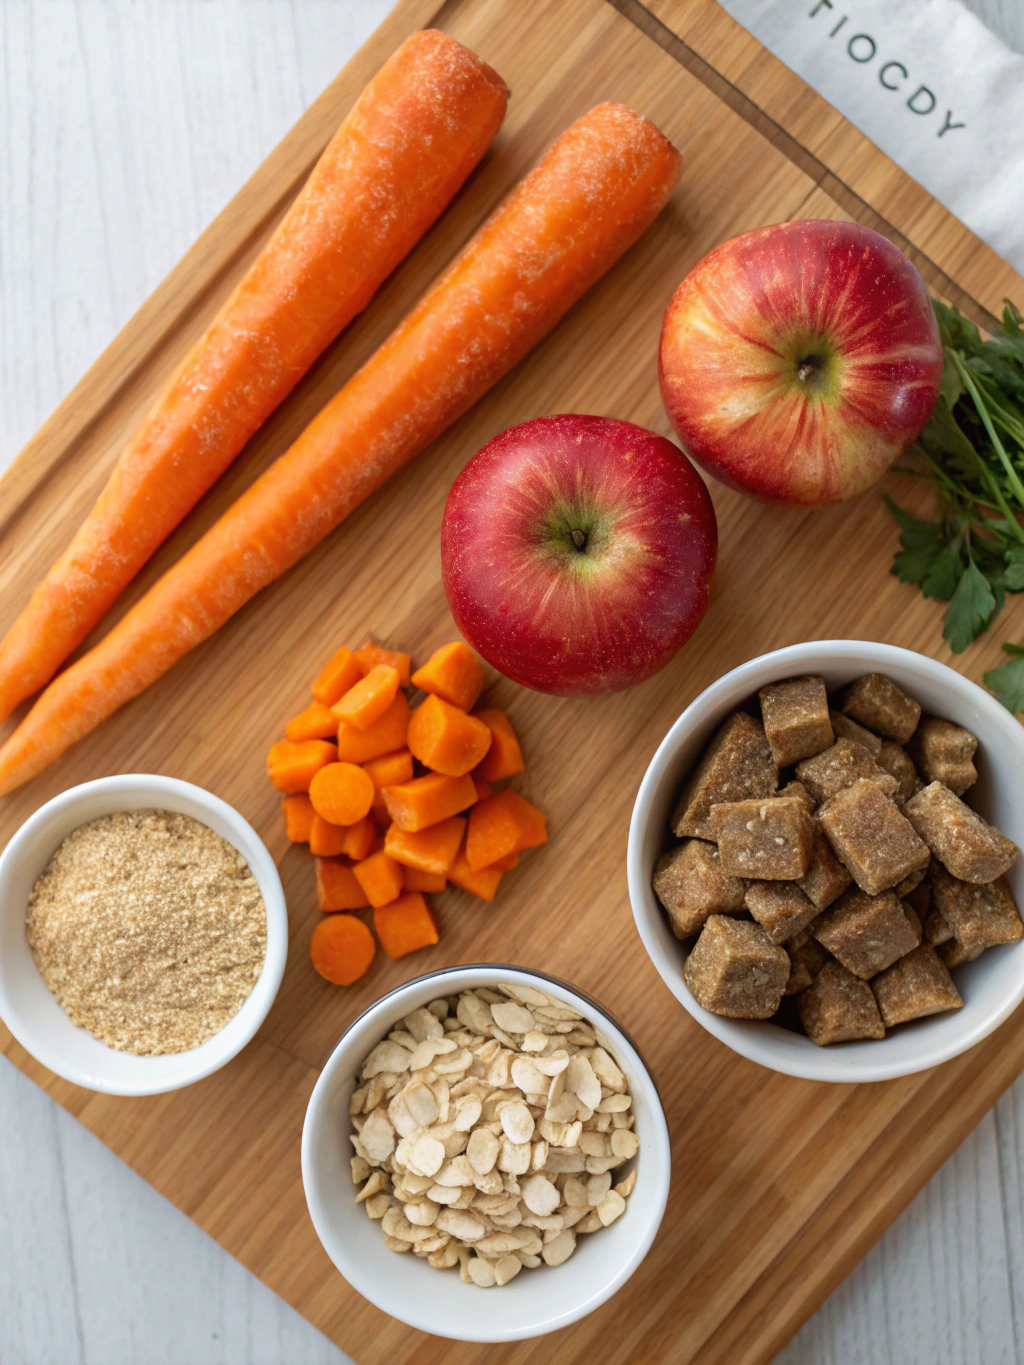
Creating the perfect batch of homemade dog treats starts with the right ingredients. Here’s what you’ll need:
- 1 cup of rolled oats: Make sure to grind them into a fine flour in your blender.
- 1/2 cup of pumpkin puree: Choose organic pumpkin puree for the best health benefits.
- 1/4 cup of unsweetened applesauce: Ensure it’s plain, with no added sugars.
- 1 tablespoon of chia seeds: Chia seeds offer omega fatty acids, which are beneficial for your dog’s coat and skin.
- 1 tablespoon of flax seeds: These can be ground to be easily absorbed and add nutritional value.
- 1/2 cups of shredded carrots: Carrots are rich in vitamins and give the treats a pleasant crunch.
- 1 tablespoon of coconut oil: Choose unrefined coconut oil for the best health benefits.
- 1 cup of whole wheat flour: Optional, for thickening the dough if needed. Serve this sparingly.
- A dash of cinnamon: A natural spice that can soothe digestion.
Tips: If you’re looking for a replacement for pumpkin, sweet potato works equally well. Prioritize organic produce when available to eliminate pesticide concerns.
Timing
Preparing this batch of dog treats is a relaxing activity that takes about 90 minutes in total. It involves approximately 20 minutes for prep time and 70 minutes for baking, cooling, and some folding. This is about 25% less time compared to the average preparation time for commercial dog treats, making it a time-efficient alternative for busy pet owners.
Step-by-Step Instructions
Step 2: Mix Wet Ingredients
In a medium-sized bowl, thoroughly mix the pumpkin puree, unsweetened applesauce, and softened coconut oil. This combination not only enhances the flavor but also ensures a smooth, consistent texture for your treats.
Step 3: Add Dry Ingredients
Add your ground oat flour to the mixture. The flour will absorb the moisture, thickening the batter. This step is tricky, so add the flour gradually to reach the right consistency—similar to cookie dough.
Step 4: Incorporate Veggies and Seeds
Fold in the shredded carrots, chia seeds, and flax seeds. These additions boost nutritional content, promoting health benefits like improved digestion and a shinier coat. You might find it helpful to use your hands to mix everything until fully combined.
Step 5: Bake and Cool
Preheat your oven to 350°F (175°C). Once heated, pour your batter onto a parchment-lined baking sheet, spreading it evenly. Bake in the oven for about 20 minutes or until lightly golden. Ensuring proper baking time is crucial, as undercooked treats might not hold their shape. Let the treats cool completely on a wire rack before serving.
Nutritional Information
Each treat (approximately 1-inch square) contains about:
- 25 calories
- 2g protein
- 4g carbohydrates
- 1g fiber
- 0.5g fat
While these numbers are modest, the cumulative health benefits are significant. Pumpkin, carrots, chia, and flax seeds are powerhouses of vitamins, antioxidants, and dietary fibers that contribute to comprehensive health improvements, such as enhanced vision with eye-supporting beta-carotene from carrots and pumpkin.
Healthier Alternatives for the Routine
If your pet has a sensitive stomach or specific dietary needs, modifications can be made to ensure their treats are both delicious and safe. For instance, consider these alternatives or additions based on your dog’s health requirements:
- Use white rice flour instead of whole wheat flour for an easily digestible blend.
- Add a tablespoon of plain, unsweetened yogurt for probiotics, which support better digestion.
- Replace pumpkin puree with sweet potato puree for a different flavor, beneficial if your dog has a glucose intolerance.
Always introduce new foods gradually to monitor for any adverse reactions, and tailor the recipe based on your pet’s unique dietary needs.
Serving Suggestions
Serving your homemade healthy dog treats doesn’t have to be plain; consider enhancing the experience with these ideas:
- Crumble a few treats over their regular food to add a tasty crunch.
- Freeze the treats in an ice tray with some water. This creates a novel, cooling snack for hot days, as the crunch can soothe aching gums.
- Use them as rewards during training sessions; each bite will be a moment of happy bonding.
These strategies not only make snack times more enjoyable but also add variation, keeping your furry friend interested.
Common Mistakes to Avoid
Baking homemade treats can be simple, yet several common mistakes might compromise your efforts or affect your pet’s health:
- Not measuring properly: Using volume measurements instead of weight can lead to inconsistent results. For this recipe, ensure the flour is packed correctly to get the right texture. The ideal ratio for oat-to-flour mixes is generally 2:1 by volume.
- Baking at incorrect temperatures: Baking too hot can cause the edges to burn before the centers cook through. Always set your oven precisely to the recommended temperature and use oven-safe thermometers to cross-check.
- Not letting treats cool: Give them enough time to solidify and reach a safe temperature. Overexcited dogs might gobble them up too quickly leading to a potential burn.
Adopting careful preparation and baking techniques ensures that each treat is perfectly crafted for your dog.
Storing Tips for the Routine
To guarantee that your homemade dog treats remain fresh and safe for consumption, proper storage is crucial. Here’s how to keep them at their best:
- Immediately transfer: Once cooled, transfer the treats into an airtight container to prevent moisture loss or entry of contaminants.
- Refrigerate for freshness: Store the container in the refrigerator. This not only preserves the texture but also keeps treats fresh for about two weeks.
- Label the container: With dates of creation and expiry, track the freshness. Use labels that clearly state it’s for pets, but no need for elaborate descriptors.#
- Freezer option: If you bake a larger batch, consider freezing individual treats in a zip lock bag to extend life and ensure you always have a fresh snack on hand. This method can preserve treats for nearly a month.
Practicing these storage methods will ensure that your pet enjoys healthy and fresh snacks every time.
Conclusion
Making your own healthy dog treats at home is not just about sparing your best friend from preservatives and artificial colors. It’s also about the love and care you put into every bite. What could be better than knowing exactly what goes inside your furry friend’s food?
Why not give this recipe a try? It promises a delightful experience for both you and your pet. Plus, anyone can achieve these results at home with minimal effort and cost. Feel free to experiment with different flavors or dog-safe ingredients to find your pet’s absolute favorite treat. And if you’re searching for more nutritious options, especially for those with sensitive needs, you might also want to consider exploring recipes specifically designed to address those dietary concerns, such as homemade best healthy dog food for sensitive stomachs. Share your journey or other variations of this recipe in the comments below—we’d love to hear from you!
FAQs
Can I substitute the pumpkin puree with anything else?
Absolutely. If pumpkin puree isn’t available or doesn’t suit your dog’s taste buds, you can substitute it with sweet potato puree or even butternut squash puree for a slightly different flavor profile and additional nutrients.
Are these treats safe for puppies as well?
Yes, these treats are generally safe for puppies, but it’s crucial that you adjust the portion sizes according to their smaller bodies and less developed digestive systems. Additionally, ensure that their overall diet balances appropriately with these treats.
How long will these treats last in the fridge?
When stored in an airtight container in the refrigerator, these homemade treats should last for about two weeks, ensuring they stay fresh and nutritious.
What are the signs that my dog is having an allergic reaction to these treats?
Signs of an allergic reaction include persistent itching, red or inflamed skin, ear infections, digestive issues like vomiting or diarrhea, and general discomfort. It’s essential to stop feeding the treat immediately and consult your vet if you notice any of these signs.
Can I add supplements like glucosamine to these treats?
Yes, you can incorporate supplements like glucosamine into the treat mix. However, it’s best to consult with your vet regarding the correct dosage and ensure the supplement is safe for your pet based on their health profile and other medications.
Dive into the world of homemade dog treats and enjoy the benefits of healthier snacks that will make treat time their favorite part of the day.